This is the 3rd and final unit of the Junior STEAM course Light, Sound, and Time. In the 3rd unit, we studied time. We wrapped up the mini-lessons. These were a series of lessons that each student gave about a chapter of a book they read in each unit. I this unit we discovered latitude and longitude, and how to calculate your location without a clock using Greenwich Mean Time (GMT). We learned about the Prime Meridan as well as the International Dateline and all about timezones. We also learned about pendulums and how they can be used to tell time. We mainly focused on the Foucault Pendulum, which is a pendulum that used the earth's rotation to tell time. We also looked at the different ancient time telling devices like sundials. We also studied the universe and dark matter and wormholes. We also learned some math concepts like calculation arc length and angle in a circle, as well as calculating vertexes. We visited the Adler Planetarium where we learned about the universe. We looked at different planets calculations, and we saw how time has affected culture and we looked at other historical devices. For this action project, we had to come up with our own time telling device. It could be inspired by an old way of telling time, but we had to make it better We then had to make a video advertising the product.
You can view the script of my video here
In conclusion, this was a pretty difficult project. I really struggled coming up with something that wasn't already come up with. Making the video was also pretty difficult. I kept messing up on the voice over and having to restart. I am proud of how my video came out as it is clear and well put together. I really enjoyed this class and I am happy with how I did. I learned a lot in this class about how we perceive the world, and I definitely see the world different now.
Works Cited:
Bendini A. Silvio. "Measurement with Insense in Japan." Japanese Insence.com. Cambridge Press. 2002. Web. 21, March 2019.
Showing posts with label Light Sound and Time. Show all posts
Showing posts with label Light Sound and Time. Show all posts
Thursday, March 21, 2019

Sunday, March 10, 2019
DIY Guitar
This is the 2nd unit in the Junior STEAM class, Light, Sound, and Time. The second unit was focused on sound. We learned all about sound and how it can be applied to the real world. We studied how light and sound are related, and how to calculate the distance it takes sound to travel. We learned about things like the Doppler effect and sonic booms, where sounds that are moving have a different pitch, or what happens when something travels faster than sound. We also studied how our ears perceive sound and the human threshold of hearing. We looked at the anatomy of the human ear and studied sound waves and measured them. To prepare for our action project, we went to the Chicago Music Exchange to learn about guitars and other instruments and how they produce sound. We were able to play instruments, and talk to experts about how the different instruments produce sound. For the action project, we made our own guitars or Diddley Bows. This is a one-stringed guitar made out of different household materials. The made the Diddley Bow, and then recorded ourselves playing it, and we drew the harmonics the played. We also calculated the length and angle of the guitar and the volume of the resonator.
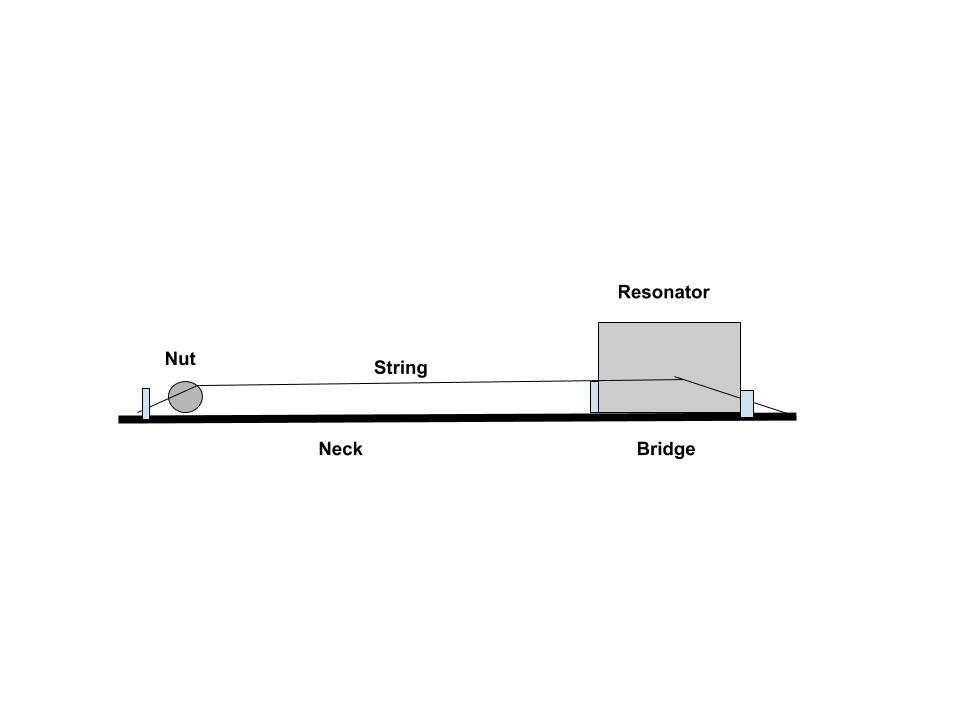
The instrument I made is called a Diddley Bow. It is a type of homemade guitar. It is made out of wood, a tin can, batteries, and guitar strings. The diddley bow can be as little as 1 string, or as many as 6. Diddley bows also have varying amounts of detail and features. My Diddley bow was made by using a 2 x 4 piece of wood and measured where I wanted the nut to go. The nut was made by using a dead AA battery. I then used a tin can as the body or the resonator of the Diddley Bow. I poked a hole in it, and then threaded the guitar string from the nut through the resonator and then tied it around the screw at the base of the resonator. I made sure that the string was taught enough to make loud enough sound but that it wasn’t too taught to play.
The Diddley Bow produces sound by vibrating the string. The string’s vibrations are amplified by the resonator or the body which is made out of a tin can. The pitch can be changed by tightening or loosening the screw that the string is attached to, like a tuning peg. Or shortening the length of the string. The volume can be changed by how hard the string is plucked. This changed the amplitude of the wave that the string makes, producing a louder sound. The width of my string is 0.05 in.
My Diddley Bow demonstrates wavelength and frequency by manipulating the strings. When the strings are plucked, a standing wave is produced. This is how sound is portrayed in waveform. The longer the wavelength, the lower the frequency and vice versa. Pitch is how our ears perceive frequency, the higher the frequency of a wave, the higher pitch it will sound. If the string is plucked and produces a high-frequency wave, a higher pitch sound will be created. If the wave has a lower frequency, it will produce a lower pitch sound. This is how the Diddley bow is played so it can produce different pitches.
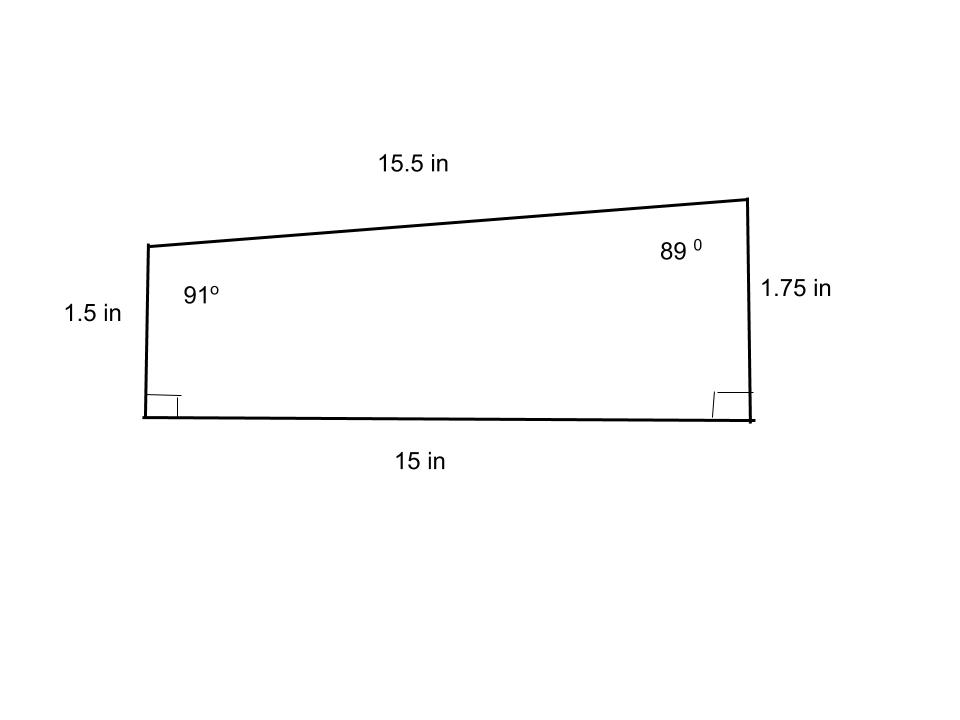
Here is a recording of me playing the Diddley Bow The side view of the guitar created a trapezoid with an area 15 x (1.5 + 1.75) / 2 = 1.625 x 15 = 24.375 sq in. I figured out how to find the angles by dividing the trapezoid into a rectangle with a triangle on top, with a base of 15 and a height of .25 and a hypotenuse of 15.5. To find the upper right angle, I calculate tan -1 (15 / .25) = 89 degrees. The left angle of the triangle is 1 degree because 89 + 90 = 179 which is 1 short of 180 degrees. This means the left angle of the trapezoid is 91 degrees because 1 + 90 = 91.
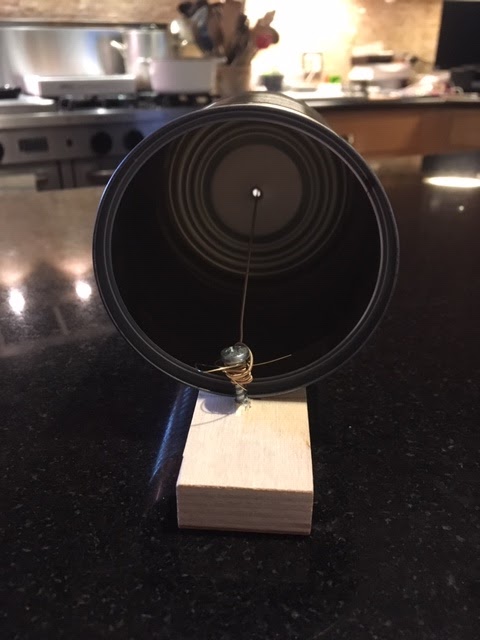
The tin can I used as a resonator has a radius of 1.75 in. To calculate volume, we need to know the area of the circle and the height. The area of my circle is π 1.75 ^2 = 9.62 cubic in. The height is 4.5 in so the volume is 4.5 x 9.62 = 43.29 cubic in
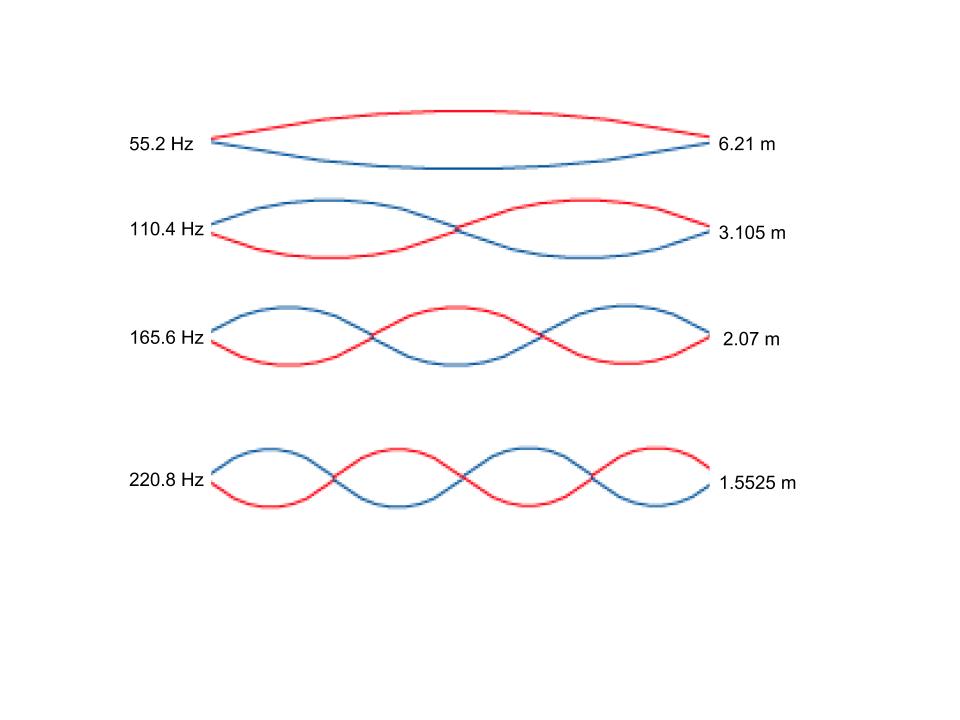
My Diddley Bow plays 4 harmonics. I found the frequency of my Diddley Bow which was 55.2 Hz (Hertz) I then found the wavelength. The speed of sound is 343 m/s so 55.2 Hz / 343 m/s = 6.21 meters which is my wavelength. As Frequency gets larger, the wavelength gets smaller.
The 1st harmonic represents the open note.
The 2nd harmonic represents the ½
The 3rd harmonic represents the ⅓ and ⅔
The 4th harmonic represents the ¼ and ¾
Frequency = 55.2 Hz Wavelenth = 6.21 meters
Frequency x 2 = 110.4 Hz Wavelength / 2 = 3.105 meters
Frequency x 3 = 165.6 Hz Wavelength / 3 = 2.07 meters
Frequency x 4 = 220.8 Hz Wavelength / 4 = 1.5525 meters
In conclusion, I liked this project. I thought it was an interesting hands-on way to learn about sound and sound waves. I enjoyed making the Diddley Bow as well as calculating it. This was a challenging project as I had a lot of other things going on, but I am proud of how the Diddley Bow actually came in the end.
 |
| CM "Diddley Bow" (2019) |
The Diddley Bow produces sound by vibrating the string. The string’s vibrations are amplified by the resonator or the body which is made out of a tin can. The pitch can be changed by tightening or loosening the screw that the string is attached to, like a tuning peg. Or shortening the length of the string. The volume can be changed by how hard the string is plucked. This changed the amplitude of the wave that the string makes, producing a louder sound. The width of my string is 0.05 in.
 |
| CM "Diagram" (2019) |
My Diddley Bow demonstrates wavelength and frequency by manipulating the strings. When the strings are plucked, a standing wave is produced. This is how sound is portrayed in waveform. The longer the wavelength, the lower the frequency and vice versa. Pitch is how our ears perceive frequency, the higher the frequency of a wave, the higher pitch it will sound. If the string is plucked and produces a high-frequency wave, a higher pitch sound will be created. If the wave has a lower frequency, it will produce a lower pitch sound. This is how the Diddley bow is played so it can produce different pitches.
Here is a recording of me playing the Diddley Bow The side view of the guitar created a trapezoid with an area 15 x (1.5 + 1.75) / 2 = 1.625 x 15 = 24.375 sq in. I figured out how to find the angles by dividing the trapezoid into a rectangle with a triangle on top, with a base of 15 and a height of .25 and a hypotenuse of 15.5. To find the upper right angle, I calculate tan -1 (15 / .25) = 89 degrees. The left angle of the triangle is 1 degree because 89 + 90 = 179 which is 1 short of 180 degrees. This means the left angle of the trapezoid is 91 degrees because 1 + 90 = 91.
 |
| CM "Trapezoid" (2019) |
The tin can I used as a resonator has a radius of 1.75 in. To calculate volume, we need to know the area of the circle and the height. The area of my circle is π 1.75 ^2 = 9.62 cubic in. The height is 4.5 in so the volume is 4.5 x 9.62 = 43.29 cubic in
 |
| CM "Resonator" (2019) |
My Diddley Bow plays 4 harmonics. I found the frequency of my Diddley Bow which was 55.2 Hz (Hertz) I then found the wavelength. The speed of sound is 343 m/s so 55.2 Hz / 343 m/s = 6.21 meters which is my wavelength. As Frequency gets larger, the wavelength gets smaller.
The 1st harmonic represents the open note.
The 2nd harmonic represents the ½
The 3rd harmonic represents the ⅓ and ⅔
The 4th harmonic represents the ¼ and ¾
Frequency = 55.2 Hz Wavelenth = 6.21 meters
Frequency x 2 = 110.4 Hz Wavelength / 2 = 3.105 meters
Frequency x 3 = 165.6 Hz Wavelength / 3 = 2.07 meters
Frequency x 4 = 220.8 Hz Wavelength / 4 = 1.5525 meters
 |
| CM "Harmonics" (2019) |
In conclusion, I liked this project. I thought it was an interesting hands-on way to learn about sound and sound waves. I enjoyed making the Diddley Bow as well as calculating it. This was a challenging project as I had a lot of other things going on, but I am proud of how the Diddley Bow actually came in the end.
Thursday, February 14, 2019
Pictures Out Of Thin Air
This is the first unit of my Junior STEAM course Light, Sound and Time. In the first unit, Light, we learned about, well, light! We learned about the electromagnetic spectrum and light waves. We also worked on trigonometry where we studied unit circles, similar triangles, and sine and cosine waves. We also studied radians and degrees, as well as Snell's Law of refraction. We only went on one Field Experience this unit. We went to The Latin School, where we met with their photography teacher Ms. Ross. We used their darkroom to develop our pictures. This was a very important FE, because we couldn't have done the Action Project without her and the Latin School's support. We also did an experiment where we saw which lamp would raise the temperature of a piece of chocolate the most. This was so we could further understand how light and energy interact with different objects. For the first AP, we made a pinhole camera. We made the cameras in class and then took them to The Latin School where we took and developed the photos. We then had to calculate the light and distance between the lens and the object we took a picture of.
What exactly is a pinhole camera? A pinhole camera is a type of simple handmade camera. It consists of a lightproof box, a manual shutter, and a lens. The pinhole camera can take pictures by placing an object in front of the camera and putting film inside the camera. Then, you let light through the pinhole which lets a small amount of light into the completely dark camera, where the image transfers to the film. The film is then developed, and if it works, you are left with an image. It is important that the inside of the camera is all black so it is completely light proof. The black inside of the camera makes sure all the light is absorbed and the only light coming through is through the pinhole. The pinhole camera does not refelct or refract light because light is not bouncing off anything, nor is it entering a different medium. This is the same principle as the camera obscura. This was a technique that painters used hundreds of years ago to paint realistic pictures. They would have an all dark room where there is only a small hole that lets light in which will project the image outside onto the back wall. The light that comes into the camera is part of the visible spectrum on the electromagnetic spectrum. This is a spectrum of wavelengths that includes everything from gamma rays to radio waves. The light acts as energy when it moves into the pinhole of the camera. Light can act as both a wave and a particle. This is because rays of light can pass through each other on not bounce off. Light acts as a particle because when it hits metal, the light is absorbed.
For this project, I used an empty oatmeal container. I punched a hole in it and then painted the inside black with black acrylic paint. I also painted the top so the whole thing would be lightproof. I then took an empty soda can and cut a circle out of it with an X-Acto knife. Then I used a pin and poked a hole through the aluminum. Then I sanded it with sandpaper so everything was smooth. This is the lens. I taped the lens behind the hole in the container and added another coat of black paint. Then I created a shutter out of black duct tape.
When we went to the dark room at the Latin School. I did everything I could to produce a picture. I tried twice, but both attempts did not turn out. The first one was all black which most likely means it was overexposed, even though the shutter speed was the recommended time. Shutter speed is how long the lens was letting in light for. For the first attempt with the plain white background, the recommended shutter speed was 3.5 minutes, which I followed. The second attempt had a checkered background which was 5 mins, which I followed. I also left the photo in the chemicals for the right amount of time. The second attempt, I chose the background that needs a longer shutter speed. I did this for the correct time as well, but this one also did not turn out. My best guess is that both attempts were overexposed. I don't know why, but I think I left them both out for too long.
Here are my calculations showing the light rays interacting with my object.
Distance From Film to Pinhole (Diameter): 4 in
Pinhole Height: 3.25 in
Total Camera Height: 7 in
Curved Hemostat: 5 in
In the end, I really liked this project. It was very hands-on and we actually got to make something that may or may not work. This was a challenging product because we had to go somewhere else to do this project on a very limited time schedule. This meant that I only got 2 tries out of my camera with very little time to focus. This was a very unique challenge, and it made me think and work hard to figure out why my camera didn't work. I am proud of how my camera was designed, but I still don't really know why it didn't work.
 |
| CM "Pinhole" (2019) |
 |
| CM "Diagram" (2019) |
 |
| CM "Developed Photo" (2019) |
 |
| CM "Black" (2019) |
 |
| CM "Camera" (2019) |
Here are my calculations showing the light rays interacting with my object.
Distance From Film to Pinhole (Diameter): 4 in
Pinhole Height: 3.25 in
Total Camera Height: 7 in
Curved Hemostat: 5 in
 |
| CM "Calculations" (2019) |
Subscribe to:
Posts (Atom)
Marine Biodiversity Literature Review
It's officially my last action project at GCE! I've done over 80 action projects and here is my last. This project is for my last Se...

-
 Could I build a water filter? This was the question I asked myself after I learned what we were doing for our 2nd action project. In unit 2 ...
 -
 The class we are taking is called Water. We are ending Unit 1 with an action project. In this class we have learned all about the proc...
 -
It's officially my last action project at GCE! I've done over 80 action projects and here is my last. This project is for my last Se...
