About Me

I am a student at GCE Lab School in Chicago. This is my blog to show all my work.

Pages

Sunday, March 10, 2019

DIY Guitar

This is the 2nd unit in the Junior STEAM class, Light, Sound, and Time. The second unit was focused on sound. We learned all about sound and how it can be applied to the real world. We studied how light and sound are related, and how to calculate the distance it takes sound to travel. We learned about things like the Doppler effect and sonic booms, where sounds that are moving have a different pitch, or what happens when something travels faster than sound. We also studied how our ears perceive sound and the human threshold of hearing. We looked at the anatomy of the human ear and studied sound waves and measured them. To prepare for our action project, we went to the Chicago Music Exchange to learn about guitars and other instruments and how they produce sound. We were able to play instruments, and talk to experts about how the different instruments produce sound. For the action project, we made our own guitars or Diddley Bows. This is a one-stringed guitar made out of different household materials. The made the Diddley Bow, and then recorded ourselves playing it, and we drew the harmonics the played. We also calculated the length and angle of the guitar and the volume of the resonator.

CM "Diddley Bow" (2019)
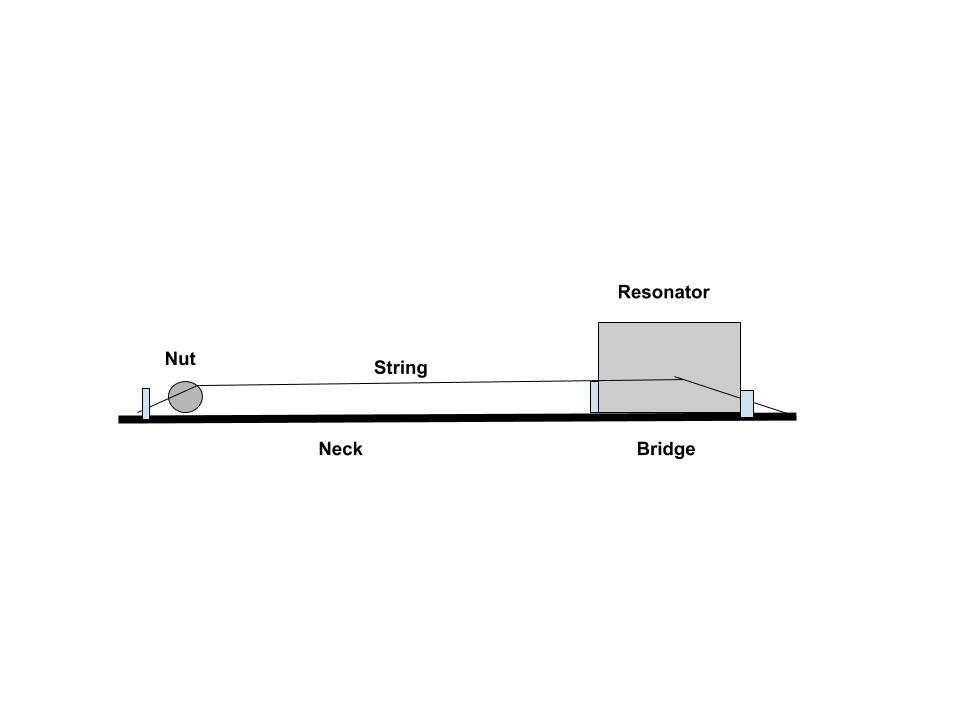
The instrument I made is called a Diddley Bow. It is a type of homemade guitar. It is made out of wood, a tin can, batteries, and guitar strings. The diddley bow can be as little as 1 string, or as many as 6. Diddley bows also have varying amounts of detail and features. My Diddley bow was made by using a 2 x 4 piece of wood and measured where I wanted the nut to go. The nut was made by using a dead AA battery. I then used a tin can as the body or the resonator of the Diddley Bow. I poked a hole in it, and then threaded the guitar string from the nut through the resonator and then tied it around the screw at the base of the resonator. I made sure that the string was taught enough to make loud enough sound but that it wasn’t too taught to play.


The Diddley Bow produces sound by vibrating the string. The string’s vibrations are amplified by the resonator or the body which is made out of a tin can. The pitch can be changed by tightening or loosening the screw that the string is attached to, like a tuning peg. Or shortening the length of the string. The volume can be changed by how hard the string is plucked. This changed the amplitude of the wave that the string makes, producing a louder sound. The width of my string is 0.05 in.
CM "Diagram" (2019)


My Diddley Bow demonstrates wavelength and frequency by manipulating the strings. When the strings are plucked, a standing wave is produced. This is how sound is portrayed in waveform. The longer the wavelength, the lower the frequency and vice versa. Pitch is how our ears perceive frequency, the higher the frequency of a wave, the higher pitch it will sound. If the string is plucked and produces a high-frequency wave, a higher pitch sound will be created. If the wave has a lower frequency, it will produce a lower pitch sound. This is how the Diddley bow is played so it can produce different pitches.

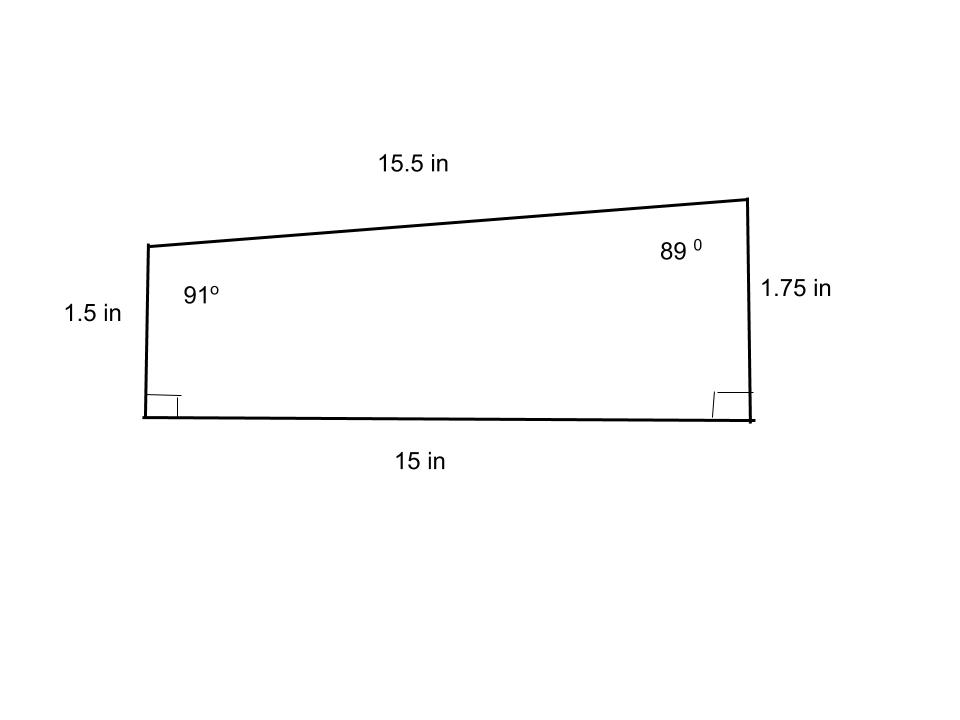
Here is a recording of me playing the Diddley Bow The side view of the guitar created a trapezoid with an area 15 x (1.5 + 1.75) / 2 = 1.625 x 15 = 24.375 sq in. I figured out how to find the angles by dividing the trapezoid into a rectangle with a triangle on top, with a base of 15 and a height of .25 and a hypotenuse of 15.5. To find the upper right angle, I calculate tan -1 (15 / .25) = 89 degrees. The left angle of the triangle is 1 degree because 89 + 90 = 179 which is 1 short of 180 degrees. This means the left angle of the trapezoid is 91 degrees because 1 + 90 = 91.

    CM "Trapezoid" (2019)

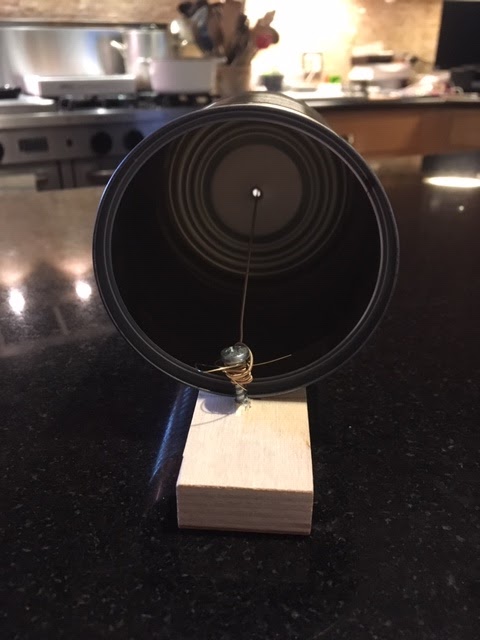
The tin can I used as a resonator has a radius of 1.75 in. To calculate volume, we need to know the area of the circle and the height. The area of my circle is π 1.75 ^2 = 9.62 cubic in. The height is 4.5 in so the volume is 4.5 x 9.62 = 43.29 cubic in

CM "Resonator" (2019)

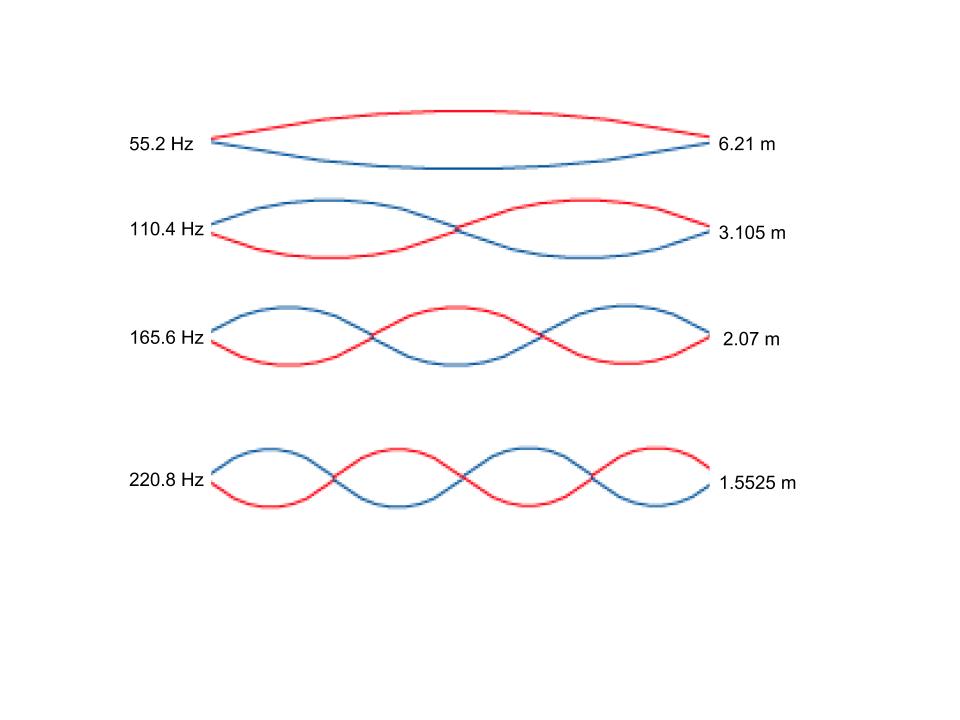
My Diddley Bow plays 4 harmonics. I found the frequency of my Diddley Bow which was 55.2 Hz (Hertz) I then found the wavelength. The speed of sound is 343 m/s so 55.2 Hz / 343 m/s = 6.21 meters which is my wavelength. As Frequency gets larger, the wavelength gets smaller.

The 1st harmonic represents the open note.

The 2nd harmonic represents the ½

The 3rd harmonic represents the ⅓ and ⅔

The 4th harmonic represents the ¼ and ¾


Frequency = 55.2 Hz Wavelenth = 6.21 meters

Frequency x 2 = 110.4 Hz Wavelength / 2 = 3.105 meters

Frequency x 3 = 165.6 Hz Wavelength / 3 = 2.07 meters

Frequency x 4 = 220.8 Hz Wavelength / 4 = 1.5525 meters

CM "Harmonics" (2019)

In conclusion, I liked this project. I thought it was an interesting hands-on way to learn about sound and sound waves. I enjoyed making the Diddley Bow as well as calculating it. This was a challenging project as I had a lot of other things going on, but I am proud of how the Diddley Bow actually came in the end.


Friday, February 15, 2019

Declaring My Independence

This is the first unit of my Junior Humanities class A Nation's Argument. In this class, we are learning about the history of our nation and our independence, as well as argument strategies that we can use, as well as the founding fathers. We learned about premises and conclusions as well as inductive and deductive reasoning. These are all key tools in forming a solid argument. We have been reading Howard Zinn's "A People's History of the United States." This book gives us a different perspective on our nation's history. We also took part in Yale University's online lecture series. We participated in a lecture on American history from Professor Freeman. We compared and contrasted the views of Zinn and Freeman. We had a Field Experience where we went to the Daley Center in Chicago. We participated in their Black History Month tours where they let schools into courtrooms for hearings. We witnessed the opening statements from a case between an ER nurse and a patient. For this action project, we declared our independence. We declared an independent study that we could do in school and we had to defend our argument.

Hiu To, "Suture" (2018)
I am here to declaration my right of Life, Liberty, and Pursuit of Happiness. I believe it is my right to learn and practice the field of medicine I want to go into. I want to learn surgical procedures at a medical school’ residency level of schooling in my junior year. Education is an unalienable right in this country and it should have no restrictions when it comes to age, ability, race, gender, political views, or economic status. Anyone and everyone has the right to learn no matter what.

The purpose of school is to teach young people what they need to know t advance in their careers, from the most basic level or learning to share in preschool, to learning a 14-hour complicated procedure in residency, learning is always happening and always important. School was invented for this reason exactly: to teach young people what they need to know to be successful in whatever they choose to pursue. I believe if a young person is dedicated enough, age and legality should not interfere with their right to pursue their passion for learning.

I have a right to education as a human. According to Right To Education.org :

"Education as a human right means:
  • The right to education is legally guaranteed for all without any discrimination.
  • States have the obligation to protect, respect, and fulfill the right to education.
  • There are ways to hold states accountable for violations or deprivations of the right to education"
This list of statements supports my declaration in the areas that: education is an unalienable right, education knows no limits no matter who you are; and that no one can deny you education. This declaration is an expression of my unalienable rights because I want to pursue my education further than my age allows. Even though I am only a Junior in high school, I believe it is my right as a human being to study at a much higher level of surgery and surgical procedures than is typically considered right for my age.

My guiding question is: Is it my right to pursue an advanced study of surgery at a young age?

I have a right to my study because:

P(1) Every human has a right to education.

P(2) Education cannot be limited by age or ability.

P(3) States have an obligation to fulfill the rights of education

Conclusion: I have the right to practice and learn surgical procedures at my age.

My syllogism: “Education is a human right, learning surgery is education, therefore, learning surgery is a human right.” This represents my declaration in it’s most basic form. Since education is a human right, I have the right to education, so, therefore, I can learn surgery and it is my human right.

The Declaration of Independence written by Thomas Jefferson 1776, The declaration included similar syllogisms to my declaration. The most recognized syllogism in the Declaration is: All people are born with the right to life, liberty and the pursuit of happiness. Therefore, the American Colonists are born with the right to life, liberty and the pursuit of happiness.

My declaration states that I want:
  • To be able to study advanced surgical procedures at my age
  • To be able to practice surgucal procedures at my age
  • To be able to get credit for medical school.
  • To be able to study at a medical school/residential level.
These are my desired outcomes that I would like to see happen if my proposal is accepted.

Here is a list of things I will need to make this happen:
  • Surgical Supplies and practice dummies
  • Medical school materials
  • Connections at medical schools
  • Surgical training materials
  • A teacher
  • A place in the school to practice
Here is my final Declaration:

“I CM, believe it is my right as a human to an education of my choosing. It is my right to learn, so I have the right to learn about what I want. I want to learn about surgical procedures and practice them even at my young age. I can do this because it is my unalienable right as a human to have an education. To the most basic extent: “Education is a human right, learning surgery is education, therefore, learning surgery is a human right.” This is why I, CM am declaring my right to study what I propose, as it is my right.

I think this was a somewhat challenging and thought-provoking project. I liked how individual it was for each student, everyone was able to do their project on what they thought was important. I thought about how to make this different from my existing independent study of surgery, so I decided to go broader and make a bigger statement than my existing study. I am proud of how my declaration turned out, and I think the most challenging part was making the declaration a soild argument. I enjoyed this project, and I am interested to see what my other classmates declared.

Works Cited:

"Understanding Education as a Right." Right Toe Education.org. 2018. GreenNet. Web. 14, Feb 2019.

Thursday, February 14, 2019

Pictures Out Of Thin Air

This is the first unit of my Junior STEAM course Light, Sound and Time. In the first unit, Light, we learned about, well, light! We learned about the electromagnetic spectrum and light waves. We also worked on trigonometry where we studied unit circles, similar triangles, and sine and cosine waves. We also studied radians and degrees, as well as Snell's Law of refraction. We only went on one Field Experience this unit. We went to The Latin School, where we met with their photography teacher Ms. Ross. We used their darkroom to develop our pictures. This was a very important FE, because we couldn't have done the Action Project without her and the Latin School's support. We also did an experiment where we saw which lamp would raise the temperature of a piece of chocolate the most. This was so we could further understand how light and energy interact with different objects. For the first AP, we made a pinhole camera. We made the cameras in class and then took them to The Latin School where we took and developed the photos. We then had to calculate the light and distance between the lens and the object we took a picture of.

CM "Pinhole" (2019)
What exactly is a pinhole camera? A pinhole camera is a type of simple handmade camera. It consists of a lightproof box, a manual shutter, and a lens. The pinhole camera can take pictures by placing an object in front of the camera and putting film inside the camera. Then, you let light through the pinhole which lets a small amount of light into the completely dark camera, where the image transfers to the film. The film is then developed, and if it works, you are left with an image. It is important that the inside of the camera is all black so it is completely light proof. The black inside of the camera makes sure all the light is absorbed and the only light coming through is through the pinhole. The pinhole camera does not refelct or refract light because light is not bouncing off anything, nor is it entering a different medium. This is the same principle as the camera obscura. This was a technique that painters used hundreds of years ago to paint realistic pictures. They would have an all dark room where there is only a small hole that lets light in which will project the image outside onto the back wall. The light that comes into the camera is part of the visible spectrum on the electromagnetic spectrum. This is a spectrum of wavelengths that includes everything from gamma rays to radio waves. The light acts as energy when it moves into the pinhole of the camera. Light can act as both a wave and a particle. This is because rays of light can pass through each other on not bounce off. Light acts as a particle because when it hits metal, the light is absorbed.

For this project, I used an empty oatmeal container. I punched a hole in it and then painted the inside black with black acrylic paint. I also painted the top so the whole thing would be lightproof. I then took an empty soda can and cut a circle out of it with an X-Acto knife. Then I used a pin and poked a hole through the aluminum. Then I sanded it with sandpaper so everything was smooth. This is the lens. I taped the lens behind the hole in the container and added another coat of black paint. Then I created a shutter out of black duct tape.
CM "Diagram" (2019)

CM "Developed Photo" (2019)
CM "Black" (2019)
When we went to the dark room at the Latin School. I did everything I could to produce a picture. I tried twice, but both attempts did not turn out. The first one was all black which most likely means it was overexposed, even though the shutter speed was the recommended time. Shutter speed is how long the lens was letting in light for. For the first attempt with the plain white background, the recommended shutter speed was 3.5 minutes, which I followed. The second attempt had a checkered background which was 5 mins, which I followed. I also left the photo in the chemicals for the right amount of time. The second attempt, I chose the background that needs a longer shutter speed. I did this for the correct time as well, but this one also did not turn out. My best guess is that both attempts were overexposed. I don't know why, but I think I left them both out for too long.

CM "Camera" (2019)

Here are my calculations showing the light rays interacting with my object.

Distance From Film to Pinhole (Diameter): 4 in

Pinhole Height: 3.25 in

Total Camera Height: 7 in

Curved Hemostat: 5 in

CM "Calculations" (2019)
In the end, I really liked this project. It was very hands-on and we actually got to make something that may or may not work. This was a challenging product because we had to go somewhere else to do this project on a very limited time schedule. This meant that I only got 2 tries out of my camera with very little time to focus. This was a very unique challenge, and it made me think and work hard to figure out why my camera didn't work. I am proud of how my camera was designed, but I still don't really know why it didn't work.

Friday, January 18, 2019

Plastic Straws Begone

In the last unit of my elective class Biomimicry, we learned about fungi. We learned the different parts of a mushroom, and different decomposers and detritivores as well as composting and decomposition. We also learned about closed loop economies and closed loop systems versus linear economies. This is the difference between a product that supports itself and can be upcycled, or a product that is used and then discarded. Our class visited The Plant Chicago to learn about aquaponics. We toured their facility and did our own design activity. We also visited Interface, which is a sustainable carpet company founded by Ray Anderson. We learned about what it takes to make a large company sustainable. For this project, we picked a product to redesign. We had to research how the product is made currently, and then redesign our product to make it a closed loop system. We then compared it to Interface's "Mount Sustainability." This is a set of goals that interface set to become the most sustainable company, My project was actually able to reach the top of the mountain.


I did like this project because it was more of a redesign of an existing product rather than a total redesign. I am proud of the research that I did because my family has recently given up plastic straws. My favorite part of this project was drawing the systems. I liked this because it was more hands-on than just doing a slideshow. This project made me realize more and more that we need a solution to plastic straws. I think there are enough ways to make straws sustainable and eco-friendly, but everyone needs to come together to make it a reality.

Becoming A Satyagrahi

In the final unit of my elective humanities class, Global Peace, we continued to study violence and intervention. We also continued our studies of Gandhi and is 4 principles of nonviolence and Sharp's Methods. We did not have much time between our last project before winter break, and this project just after. We had a visit from Under A Tree which is a Socratic school organization. We talked about different beliefs and how we deal with our differences. We visited ALSO which is a violence intervention group where we learned about how to intervene peacefully in violent situations. For this project, we had to do our own violence intervention. Most of the class had been working on this project for the entire term or longer. I chose to use my time coaching skating to intervene with childhood health problems like obesity.


I really did like this project because we actually got to do something real. I really liked working with the kids and I am happy that I got to use my experience to fo a school project. This was a difficult project, because I did the actual intervention a while ago, and I had to piece things back together. I am proud that I had an impact on some people in real life. 

Thursday, December 20, 2018

Marsha P. Johnson: Fighting for LGBTQ Rights

For our class Global Peace, we studied worldwide issues and how we might go about solving them in peaceful ways. To dive further into this, we learned about Mahatma Gandhi and his principles of nonviolent actions. The principles or pillars that we studied were: Sarvodaya, Swaraj, Swadeshi, and Satyagraha. Sarvodaya means the uplifting of all or the progress of all. Swaraj means self-governing or self-rule. Swadeshi refers to local economy and self-fulfilling resources. Satyagraha is the practice of non-violent political protest. Along with Gandhi's methods, we learned about Sharpe's Methods. This is a list of 198 ways to protest nonviolently. We also learned about different types of violence. There are structural, cultural. and direct. Structural violence is violence through a large institution or bigger power. This could be through schools or even prisons. Cultural violence is violence through cultural beliefs. This could be something like honor killings in some cultures. Direct violence is direct aggression like murder or any other one on one violent actions. We studied conflict analysis tools as well. We learned about the conflict analysis tree and iceberg. The tree refers to 3 stages of analysis with the causes as the root of the tree, the core problem as the trunk, and the effects as the branches. The iceberg tool shows the hidden problems under the waterline and the visible problems above the waterline. Both of these tools can be used to analyze most conflicts.

I studied Marsha P. Johnson who was a famous LGBTQ activist and Drag Queen. She was born as a male in 1945. Johnson moved to New York at a young age and lived on the streets. She made a living by being a drag queen and prostitute on Christopher Street. She soon joined and created various organizations such as STAR and ACT UP. She was one of the key figures in early LGBTQ rights movements. I learned a lot from Marsha P. Johnson. I realized that no matter how poor you are, or how much of an outcast you are, you can still make a big difference in this world. I also learned that you can be confident in who you are no matter what. Johnson was a social outcast and part of a very small minority in New York at the time. She was a confident progressive activist who didn't let anyone tell her how to live her life.
File:A photo of Marsha P. Johnson.png
Pay It No Mind. "A Photo of Marsha. P Johnson." 7, Oct 2017.

Wednesday, December 19, 2018

Can Animals Help Us Live Sustainable Life?

For our second action project for my elective class, Biomimicry, we created designs of homes and transportation inspired by animals. In the second unit, we focused on the animal side of Biomimicry. What can we learn from animals? We discovered that we can learn from animals through Biomimicry in 3 ways: Form, Process, and Ecosystem. These are the 3 things we are inspired by. Form - the build or physical structures of the animal. Process - the behavior or processes of animals. Ecosystem - how animals interact with their environment. We also looked at how different animals move and build. We studied how wings work with Bernoulli's principle and lift, weight, drag, and thrust. We had a guest come in from Biomimicry Chicago. She showed us various animals skins, and how these skins show adaptations. She also lead us in an exercise of Biomimicry. For our action project, we had to create an architectural design and transportation design. I picked the Namibian Beetle, and the Shovel Snouted Lizard. We had to make a design, and then draw a diagram and build a model. I am proud of how my project turned out!


In the end, I really enjoyed this project. This was probably the most work intensive AP I have ever done. I was a lot of work, but it didn't feel overwhelming. I liked the challenge of this project. Unlike the last Biomimicry Ap, I really liked both of my ideas. I thought both of them were very strong and very practical. I wish my model turned out a bit better and that I could have added more detail, but we only had about 2 hours to build a full model. I am proud of this project and I thought it was very though provoking.

Marine Biodiversity Literature Review

It's officially my last action project at GCE! I've done over 80 action projects and here is my last. This project is for my last Se...